.gif)
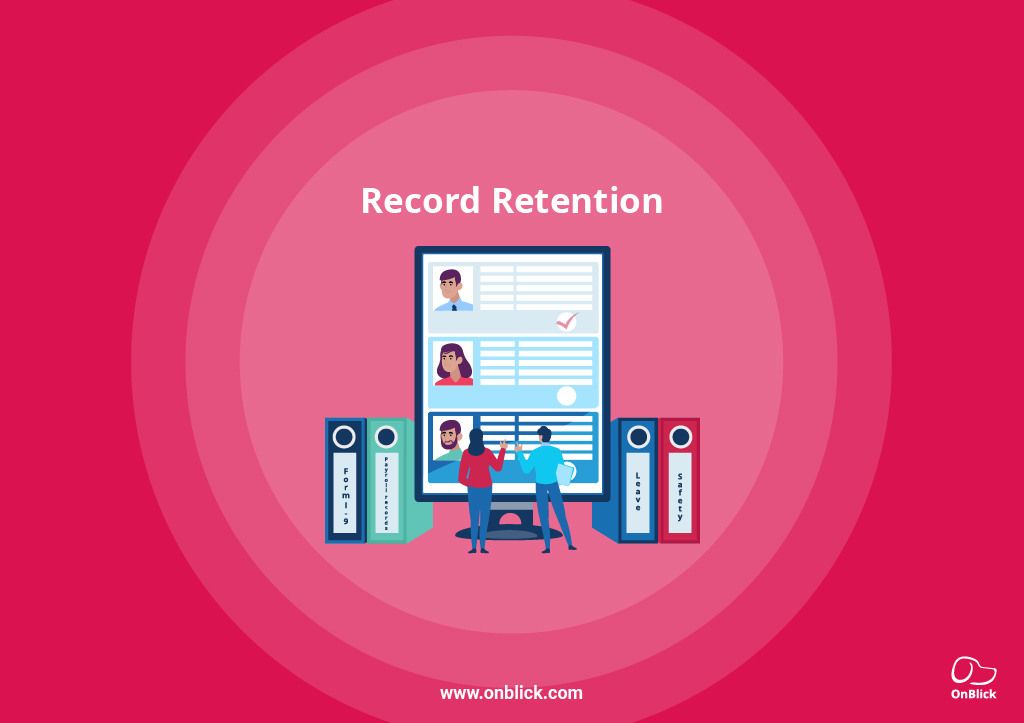

HR teams handle many work records, and the rules for keeping them are not all the same. When files sit in different places or timelines are unclear, simple requests take too long and audits feel risky. A clear, shared schedule fixes that.
Record retention works best when it is visible and repeatable. One page can show what to keep, how long, where it lives, who can see it, and when to purge it.
This article explains the basics for five areas: Form I-9, payroll, leave, safety, and performance. You will get simple timelines, a one-page matrix template, and practical tips for access, privacy, and scheduled cleanups.
What Does Record Retention Cover?
Every organization has many kinds of work records, and each has its own storage and retention rules. Some timelines come from federal law, while states can add more. Files also need the right storage, access, and a clear purge date. A simple list of categories makes the work easier to manage.
- Work Authorization: Form I-9, any document copies you choose to keep with it, and reverification history.
- Payroll and Wage: Timesheets, pay rates, schedules, overtime approvals, deductions, and final pay records.
- Leave and Accommodation: FMLA notices, certifications, state paid-leave decisions, ADA notes, and return-to-work documents.
- Safety: OSHA logs, incident reports, training sign-ins, and inspection or audit notes.
- Performance and Hiring: Job postings, interview notes, offer letters, performance reviews, warnings, PIPs, and training completions.
Use federal timelines as your baseline, then check state requirements. Decide where each file lives, who can see it, and how you will confirm purge dates. A one-page retention matrix keeps these details clear for HR, managers, and legal teams.
.jpeg)
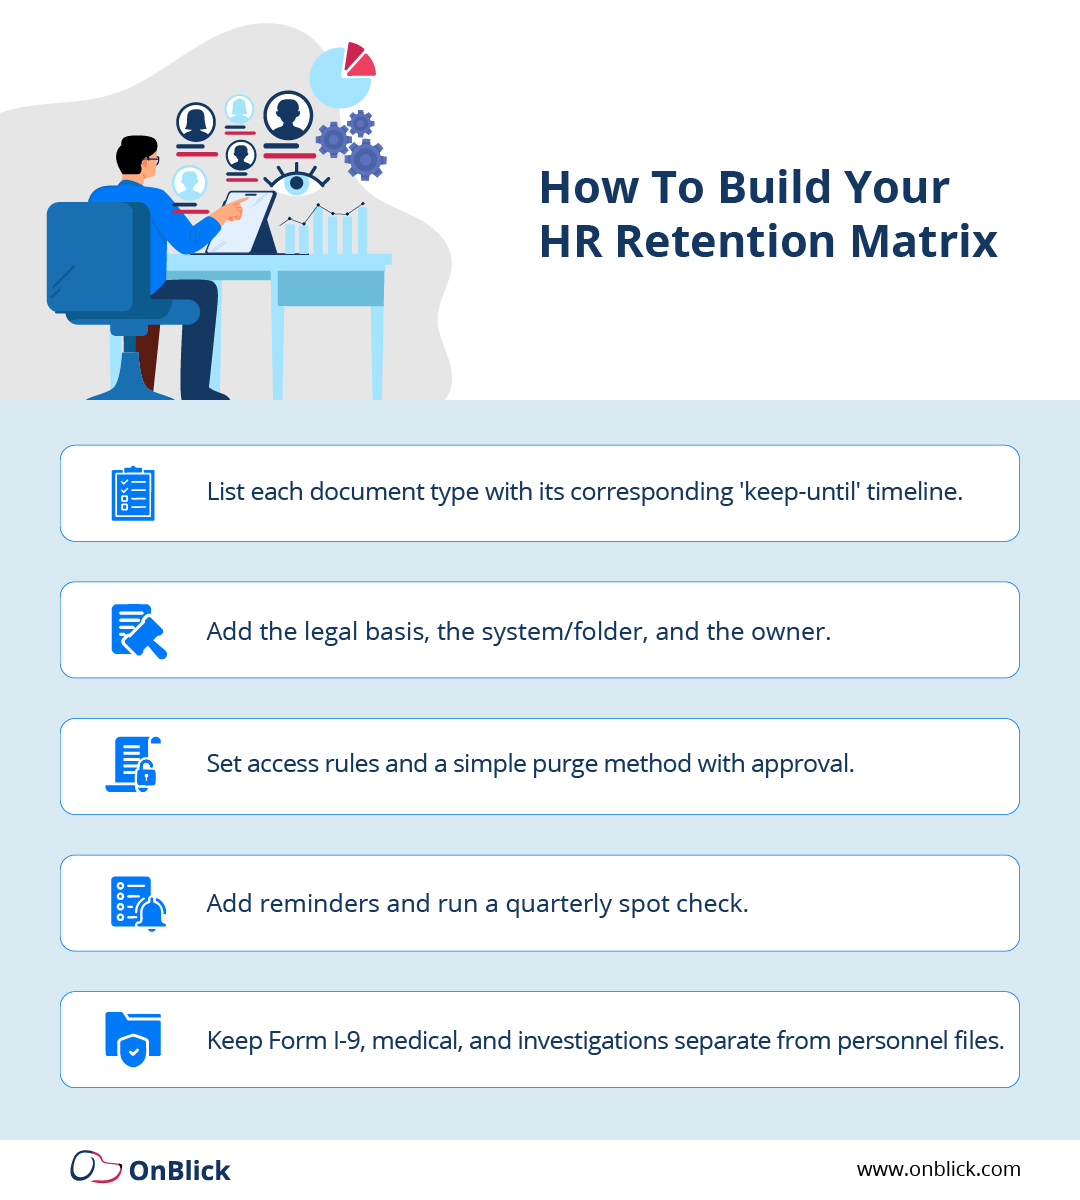
How to Build a Record Retention Matrix
A one-page record retention matrix keeps rules visible and easy to follow. It lists each document type, how long to keep it, where it lives, who can see it, and how to purge it. Build the first version with HR and Legal, then share it with managers who create or store records. Review it quarterly so timelines and owners stay current.
Here’s what your matrix should include:
- Document type: e.g., Form I-9, timesheets, FMLA certification, OSHA 300 log, performance review.
- Legal basis & timeline: Cite the federal rule and add state rules if stricter; write the “keep until” date in plain words.
- System/location: Name the exact folder or system, not “shared drive.”
- Owner & access: Who maintains it, and which roles can view it (HR only, HR + Legal, manager).
- Purge method & approval: How it will be deleted or archived, and who signs off.
Example row
Timesheets | FLSA baseline, verify state | Keep 3+ years from the last entry | OnBlick Timesheets | HR owner; manager view | Auto-purge with HR approval
Set up simple routines:
- Add purge dates when files are created.
- Use automated reminders for reviews, certifications, and purge windows.
- Run a quarterly spot check on a small sample and fix gaps immediately.
- Keep Form I-9, medical, and investigation files separate from personnel files.
Form I-9 Records: What to Keep and For How Long
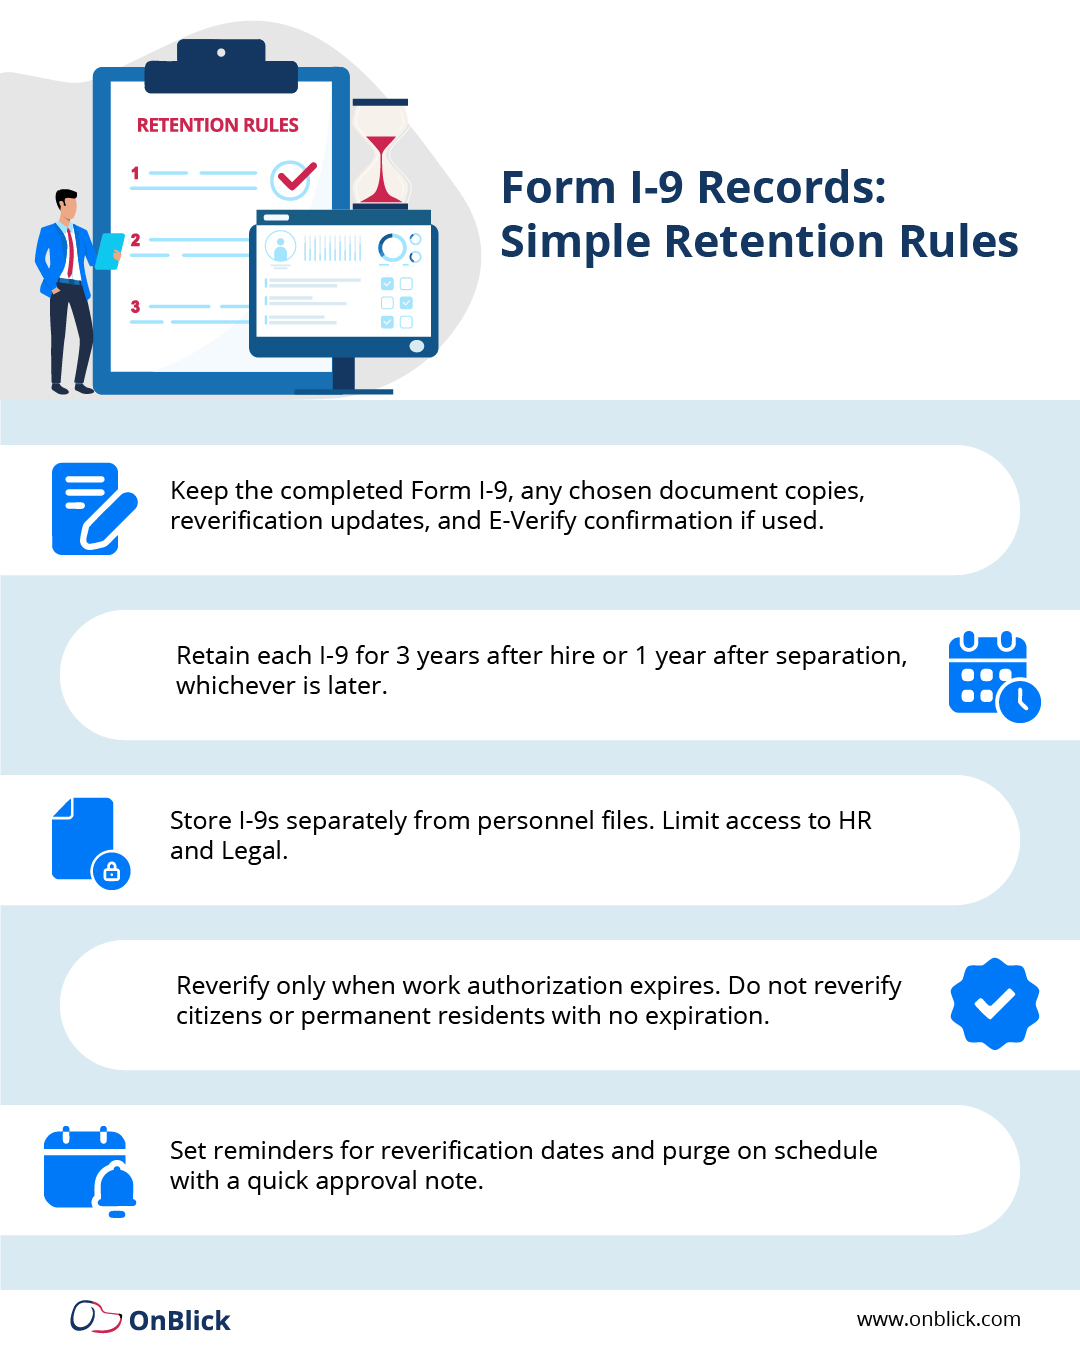
I-9 files confirm each employee’s identity and authorization to work in the United States. Clean, separate files make everyday checks and any audits faster and less stressful. Set clear rules for what goes in the I-9 file, who can see it, and when to remove it.
What belongs in the I-9 file
- The completed Form I-9 for each employee
- Any document copies your company chooses to keep with the form. Apply this choice consistently for all new hires.
- Reverification history, for example a completed Section 3 or a new form when required.
- If you use E-Verify, the case result page or confirmation number.
How long to keep your Form I-9s
- Retain each I-9 for three years after the date of hire or one year after employment ends, whichever is later.
- For rehires within three years of the original I-9, you may update Section 3 (Supplement B) if documents remain valid, or complete a new form. The same retention rule applies from the most recent separation date.
Storage and access of I-9s
- Keep I-9s separate from general personnel files. Store medical or leave documents elsewhere.
- Limit access to HR and Legal. Track who views or updates files.
- Use a simple index or checklist so you can confirm that every active employee has a current I-9.
Form I-9 Reverification basics
- Reverify only when work authorization has an expiration date.
- Do not reverify U.S. citizens or permanent residents with no expiration on status.
- Set reminders 90 and 30 days before a reverification date.
Quality checks
- Sample a few files each quarter. Look for missing signatures, incomplete sections, and expired reverifications. Fix issues and refresh training where needed.
- Purge on schedule with a brief approval note that records who reviewed and when.
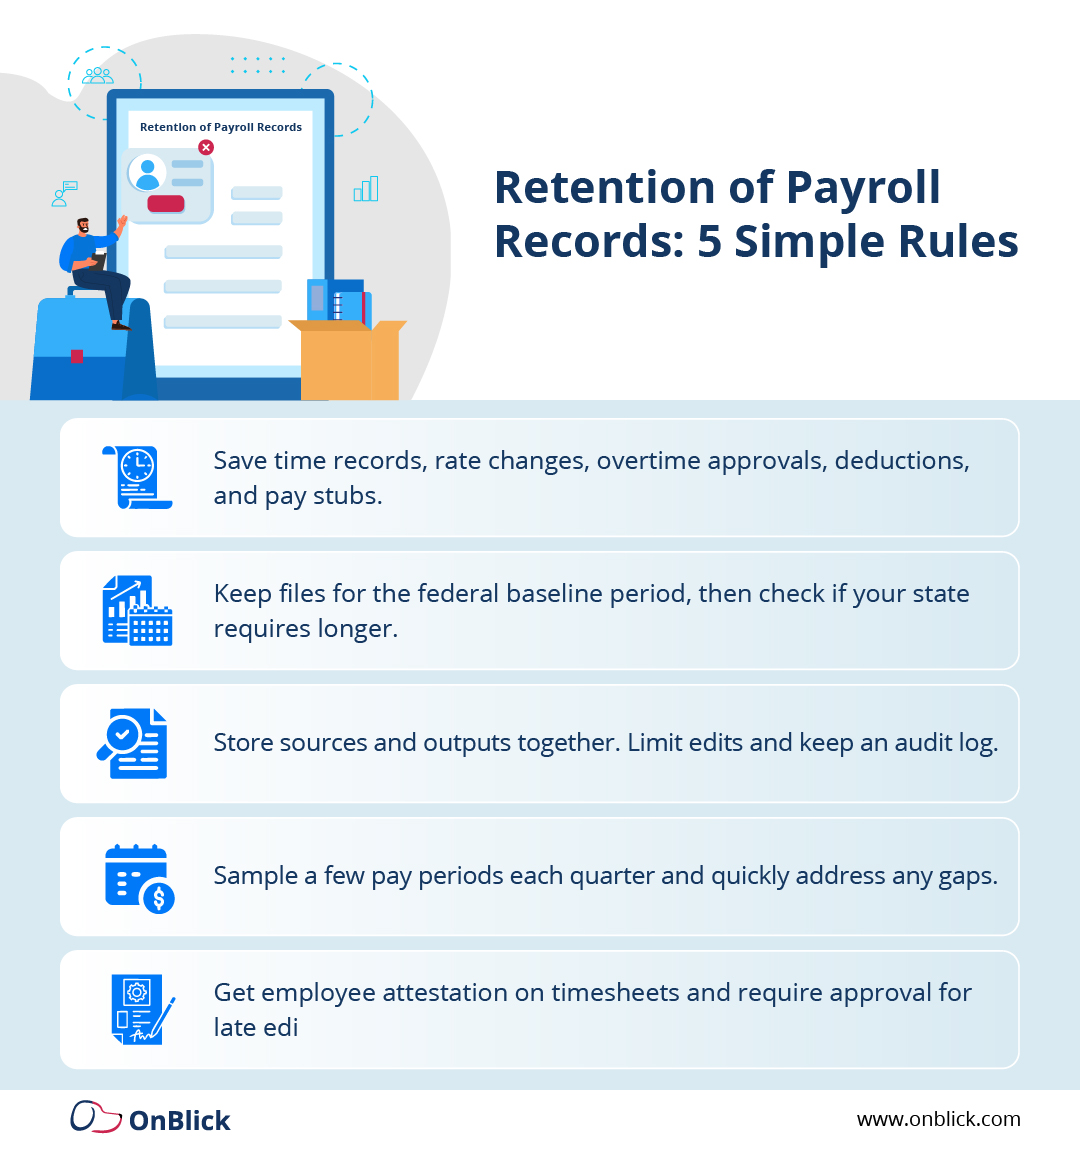
Payroll and Wage Records: What to Keep and How Long
Payroll files show hours worked, rates paid, and how pay was calculated. Clean payroll records help answer employee questions, support audits, and resolve disputes quickly. Set clear rules for what to save, where it lives, who can view it, and when to remove it. Use consistent naming, so reports are easy to find.
What belongs in payroll and wage files
- Time records: timesheets or timecards, edits history, and employee attestations.
- Pay data: pay rates, job or shift differentials, overtime approvals, bonuses, commissions, and deductions.
- Schedules and changes: published schedules, manager change approvals, and effective dates.
- Payroll outputs: gross-to-net registers, pay stubs, final pay documentation, and year-end reports.
- Supporting items: leave taken and paid, meal and rest break acknowledgments where required, and correction notes.
How long to keep payroll and wage records
- Keep time records and payroll registers for the federal baseline period, then confirm if your state requires more time.
- Keep commission plans and bonus approvals through the plan year, plus the applicable retention period.
- Keep final pay records through the retention period that applies to wage statements.
Storage and access
- Store source documents and outputs in the same system or linked folders.
- Limit edit rights. Keep audit logs for rate changes, time edits, and approvals.
- Use a simple index by employee and pay period so you can re-create a check quickly.
Quality checks
- Sample a few pay periods each quarter. Confirm time approvals, overtime calculations, and deduction authorizations.
- Verify that final pay met timing rules. Record any corrections and training given.
- Purge on schedule with a brief approval note that lists what was removed.
Practical tips
- Capture employee attestation on timesheets, for example “Hours are correct.”
- Require a reason and approver for any time edit after submission.
- Keep one current summary of pay codes, so managers use them correctly.
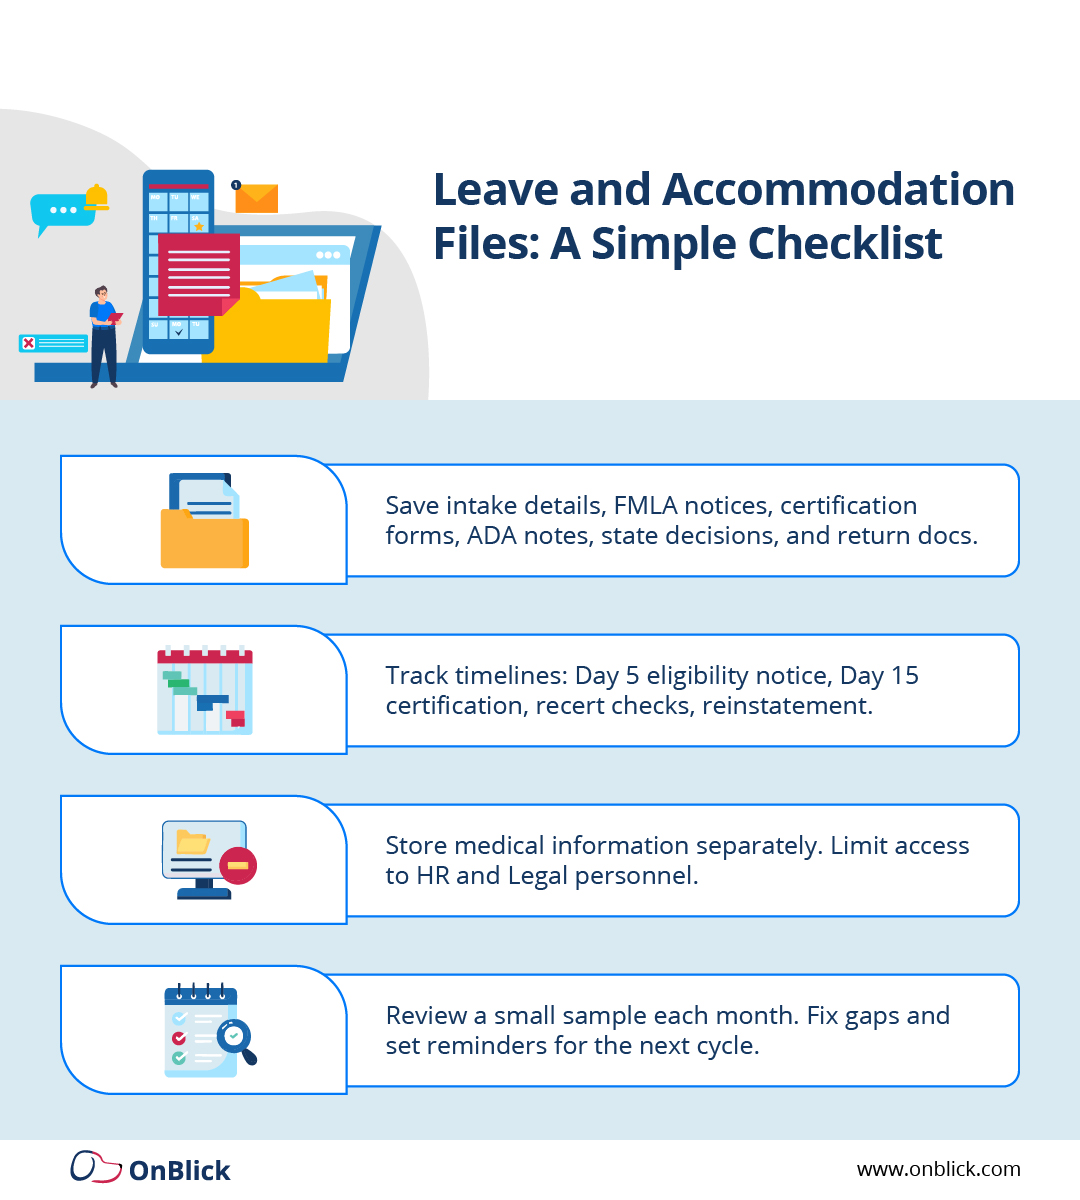
Leave and Accommodation Files: What to Keep and How Long
Leave files show why time away was requested, which laws or policies applied, and how decisions were made. When everything sits in one organized folder, HR can answer questions quickly and meet deadlines. Keep medical details confidential and store them separately from general personnel files.
What belongs in each leave file:
- Intake: Employee request, dates, work location, and initial manager note.
- FMLA notices: Eligibility and rights notice, designation notice, and dates sent.
- Certification: Medical certification request, due date, returned forms, recertification dates, and any extensions.
- ADA record: Notes from the interactive process, options considered, decisions made, and any revisit date.
- State paid leave: Claim confirmation, benefit determinations, payment notices, and correspondence.
- Return to work: Fitness-for-duty if required, reinstatement confirmation, and any follow-up schedule.
Key timelines to track
- Send FMLA eligibility and rights within five business days of learning of a potential need.
- Allow at least 15 calendar days to return medical certification.
- Record recertification checkpoints when permitted, plus any extension approvals.
- Confirm reinstatement to the same or an equivalent job at the end of qualifying leave.
Storage and access
- Keep a single leave folder per case with subfolders for Intake, Notices, Certification, ADA, State, and Return.
- Store medical information separately with restricted access.
- Limit file access to HR and Legal. Record who sent notices and who approved decisions.
Quality checks
- Review a small sample monthly. Look for missing notices, late certifications, or incomplete ADA notes.
- Fix gaps, update templates, and add reminders for the next cycle.
- Purge files on schedule according to your retention matrix with a short approval note.
Safety and OSHA Records: What to Keep and How Long
Safety files show what happened, how it was handled, and how employees were trained. Clear records help prevent repeat incidents and make required reporting simple. Set one place for safety logs, training sign-ins, inspections, and corrective actions. Give EHS/HR ownership and limit edits.
What belongs in safety files
- OSHA logs: Forms 300, 300A, and 301, plus incident investigation notes and corrective actions.
- Training: Sign-ins, curricula or slide decks, quiz results if used, and trainer qualifications.
- Inspections & audits: Checklists, photos, hazards found, and closure proofs.
- Equipment & programs: PPE fit tests, respirator and hearing records, machine guards, and safety policies.
How long to keep safety and OSHA records
- Keep OSHA 300/300A/301 logs for 5 years after the calendar year they cover.
- Retain training and exposure records per the applicable standard, and longer if your state requires it.
- Keep incident investigations and corrective actions with the related log period or until all actions are verified as closed.
Storage and access
- Store logs and investigations together, with read-only access for most roles.
- Keep medical or exposure details in a restricted folder.
- Use consistent file names, for example 2025_OSHA300_SiteA.xlsx and 2025-02-14_Incident_Investigation_SiteA.pdf.
Quality checks
- Each quarter, confirm that incidents appear on logs, investigations are complete, and corrective actions show evidence of closure.
- Before February, finalize the prior year’s 300A summary and post/distribute as required.
- Archive year-end packages with a short index listing what’s inside and who reviewed it.
.jpeg)
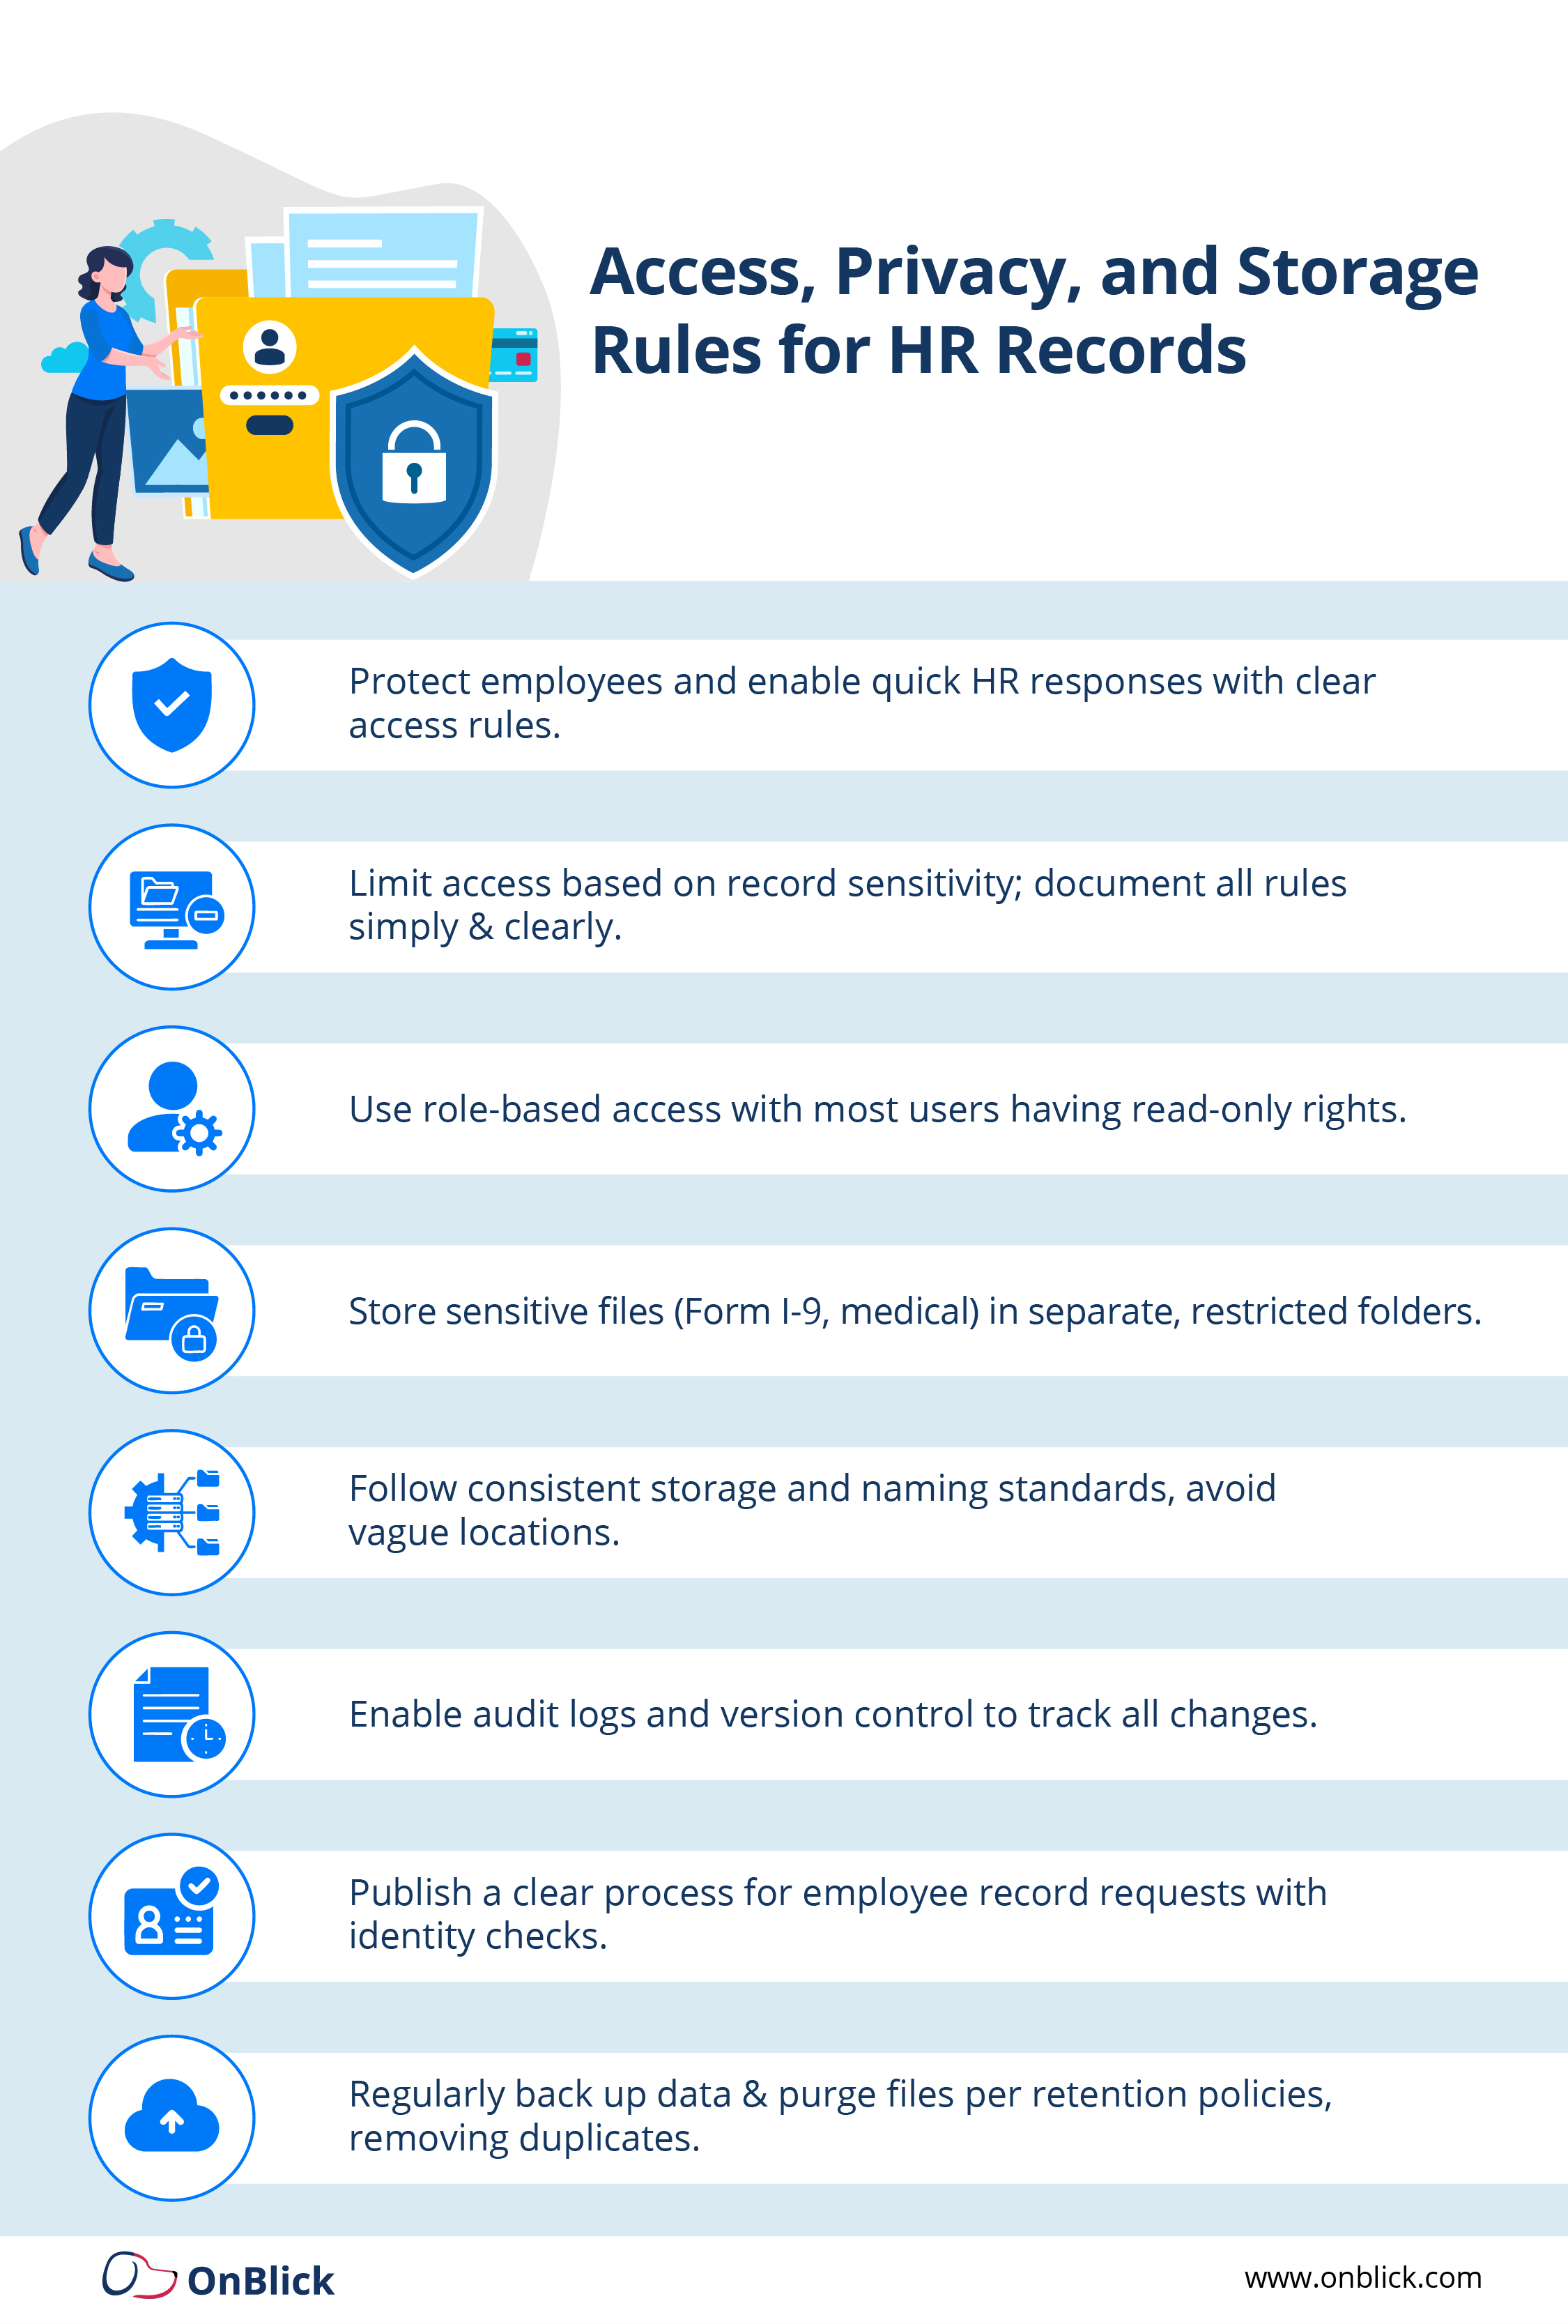
Access, Privacy, and Storage Rules
Access and storage rules protect employees and help HR answer requests quickly. Different work records carry different sensitivities, so not everyone should see everything. Write the rules down, keep them simple, and apply them the same way every time. Review access at least quarterly and whenever someone changes roles.
Role-based access
- Define who can view each category: HR only, HR + Legal, manager, or employee self-view (where policy allows).
- Limit edit rights. Most users should have read-only access, with named approvers for changes.
- Review access lists when people join, transfer, or leave. Remove access promptly.
Separate sensitive files
- Store I-9, medical, and investigation records in restricted folders, separate from general personnel files.
- Keep medical documents behind an extra layer of permission. Do not mix them with performance or payroll items.
- Use clear labels so files are not misfiled, for example Medical_Confidential or I9_Restricted.
Storage and naming
- Name the exact system or folder for each record type in your retention matrix. Avoid “shared drive” as a location.
- Use consistent file names, for example YYYY-MM-DD_DocType_EmployeeName_Version.
- Keep one current index or cover sheet in each folder that lists contents and the latest version.
Audit logs and version control
- Turn on immutable audit logs for creates, edits, views, and deletes.
- Require a short reason for edits to time records, pay rates, and sensitive notes.
- Save updated documents as new versions, do not overwrite originals.
Privacy and requests
- Publish a simple process for employees to request copies of their records.
- Verify identity before releasing documents and redact other people’s information.
- Track requests on a small log that shows request date, what was shared, and who approved it.
Backups and purge
- Back up systems on a regular schedule and test restores.
- Purge on the dates in your retention matrix, with a brief approval note that lists what was removed and by whom.
- After purging, remove any hard copies or local duplicates, so HR records exist in a single, authoritative location.
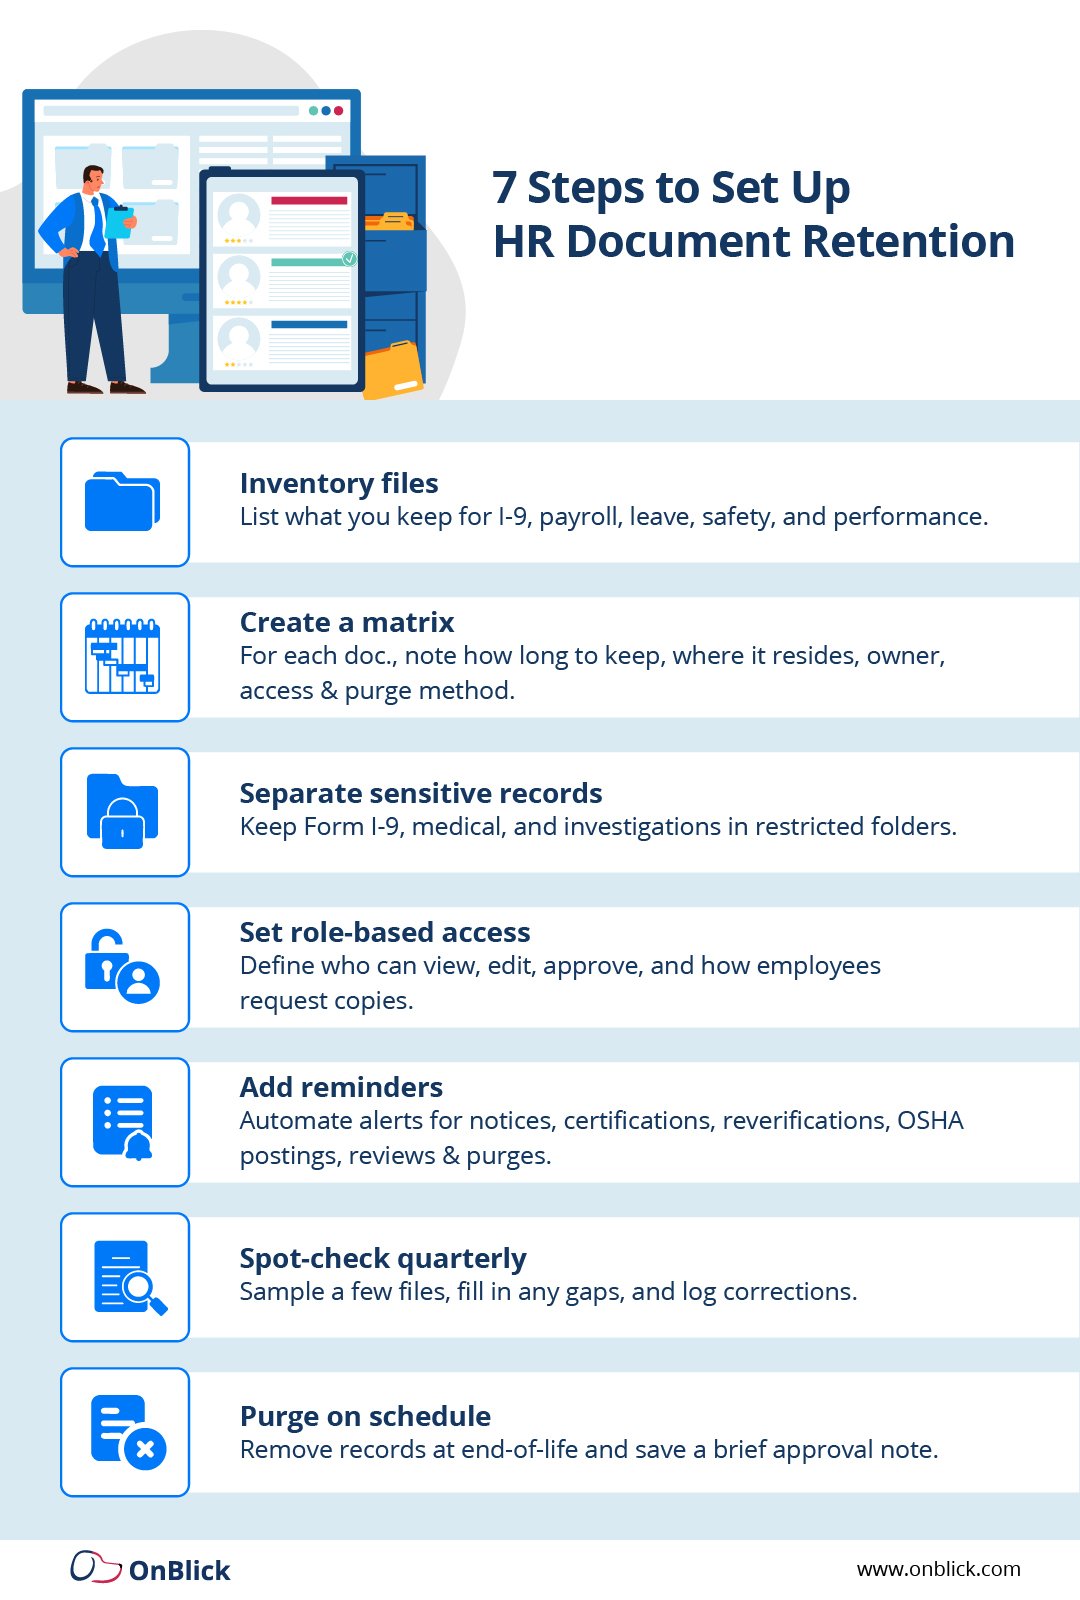
7 Steps to Set Up HR Document Retention
A clear setup turns scattered files into a reliable system. Start small, write the rules on one page, and build simple routines that repeat every quarter. These steps help you meet legal timelines, answer requests quickly, and keep audits calm.
- Inventory current files
List what you keep today for I-9, payroll, leave, safety, and performance. Note where each item lives, who can access it, and what is missing.
- Build a one-page retention matrix
For each document type, record the legal basis, how long to keep it, the exact system or folder, the owner, access rules, and the purge method with approval.
- Separate sensitive records
Move I-9, medical, and investigation files out of general personnel folders. Limit access to HR and Legal and label folders clearly.
- Set role-based access and requests
Define who can view, edit, and approve changes. Publish a simple process for employees to request copies of their records and track responses.
- Add reminders for key dates
Create automatic alerts for FMLA notices, certification deadlines, reverification dates, OSHA postings, reviews, and purge windows.
- Run quarterly spot checks
Sample a small set of files from each category. Fix gaps, refresh templates, and record what was corrected and by whom.
- Purge on schedule with approvals
Remove files at the end of their retention period. Save a short approval note that lists what was purged, the date, and the approver. Update indexes so the remaining files are easy to find.
Conclusion
A clear record retention schedule turns scattered files into a reliable system. When HR knows what to keep, how long, where it lives, and who can see it, everyday requests and audits move faster. Start with a one-page matrix, separate sensitive HR records, and review a small sample each quarter. Small, steady fixes keep your files accurate and your timelines on track.
Key Takeaways
- Use a one-page retention matrix for I-9, payroll, leave, safety, and performance.
- Separate I-9, medical, and investigation files from general personnel files.
- Set role-based access, limit edits, and keep audit logs for changes.
- Track key dates, Day 5/Day 15 for FMLA, reverifications, OSHA postings, and purge windows.
- Sample a few files quarterly, fix gaps, and update templates.
- Purge on schedule with a brief approval note that lists what was removed.
- Keep workplace records and naming consistent, so reports and audits are quick to run.
How OnBlick Helps
OnBlick centralizes Form I-9, personnel files, leave and time management records with role-based access and immutable audit logs. A built-in retention matrix applies keep-until dates, sends reminders, and runs approval-based purge workflows, so files are removed on schedule. Guided Form I-9 completion, optional E-Verify links, and clean reverification tracking keep work-authorization files separate and audit-ready.
To see the product in action, schedule a free personalized OnBlick demo